
What is Power Automate?
Power Automate is a powerful, yet simple-to-use, no-code automation tool provided by Microsoft. It enables users to create automated workflows between various applications and services to synchronize files, get notifications, collect data, and more. Power Automate helps streamline repetitive tasks and processes, freeing up time for more valuable activities.
Scenario
We need to create a memo for each employee, informing them of their new unique ID. To achieve this, we’ll use Power Automate Desktop to generate personalized memos from a blank template based on a list of employees.
For this demo, we’ll use a short list of five employees to keep the process quick and easy. However, the Power Automate flow is designed to automatically adjust to any number of employees, allowing you to add more if needed.
Blank Memo Template
The memo will follow this format:
Dear [Name],

I hope this message finds you well. This memo is to inform you that your new ID number is:

[ID]
Excel Layout
This is the format for Excel:
| Name | ID |
| Alice | 372914 |
| Bob | 684527 |
| Catherine | 951362 |
| David | 487231 |
| Emily | 629815 |
Make sure ‘Name’ is in cell ‘A1’ and the document has been saved.
Creating the Flow
Follow these steps to create the automated flow in Power Automate Desktop:
Attach to Excel
Create a new flow and make sure you have the Excel document with the names and IDs open.
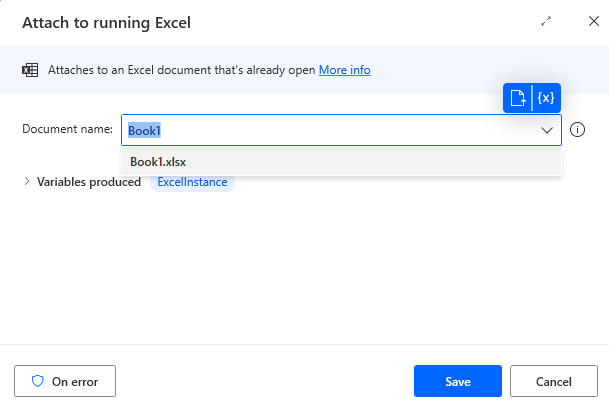
From the Actions sidebar, find Attach to running Excel and drag it to the main flow. In the window that appears, select the document containing your names and IDs. For simplicity, we don’t need additional configurations here. However, if you are using multiple Excel instances, consider renaming your variables for clarity.
This action creates a variable, this is a way for the program to remember a value, think of it like writing something down on a post-it note. In this case, the variable will reference the Excel file, allowing the program to know which file to read from later.
Get First Free Row
Next, we want to find the fist empty row in Excel so that we know how many rows to run this program for.
Drag Get first free column/row form Excel worksheet into the flow under the previous action.
The Excel instance should automatically fill in from the previous action. As we don’t need to know the first free column, we can turn that variable off to keep things tidy.
Loop Through Excel Rows
As we want to perform the same action for each row in Excel, we can use a loop.

Drag a Loop into the flow and fill in the variables. Set the start to 2, as we have the column titles in row 1 of Excel. For the end row, set %FirstFreeRow - 1%. The percentage symbols tell the program that this is an equation. FirstFreeRow is the variable we created in step 2, but this will be an empty row, so by subtracting one, we get the last row with data in it. Set the increment to 1 as we want this program to run for each row.
Read Excel Data
Next, we need to read the data from Excel.

Drag Read from Excel worksheet into the loop. By default, the instance and what to retrieve should default to the values we need for our Excel instance and single cell respectively. Set the start column to A (for names). For the row, use the variable LoopIndex as this tells the flow to read from a different row each time the program loops. Rename the produced variable to ExcelDataName.
As we have two variables, we want to change we need to repeat this step with a new action for the IDs. For the second read action, set the start column to B and rename the variable to ExcelDataID.
Launch Word
Now we have our data we need a way to use it.
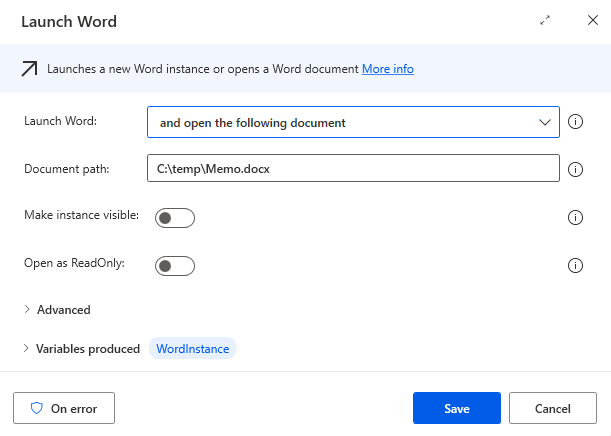
Drag a Launch Word into the loop under read Excel data. Set the document path to the location of your template document. I would also recommend turning the make instance visible button off as this will prevent the documents flashing on and off as they open and close.
Replace Text in Word
Next is to replace the data in the word document.

Drag Find and replace words in Word document into the loop. Set Find to [Name] and Replace with to %ExcelDataName%. It’s also worth setting All Matches to on if you need to insert the data in multiple locations and match whole words only to on.
Like with the read Excel data we need to repeat this step for the IDs. This time the variables will be [ID] and %ExcelDataID%.
Close Word
Finally, we want to save and close the document.
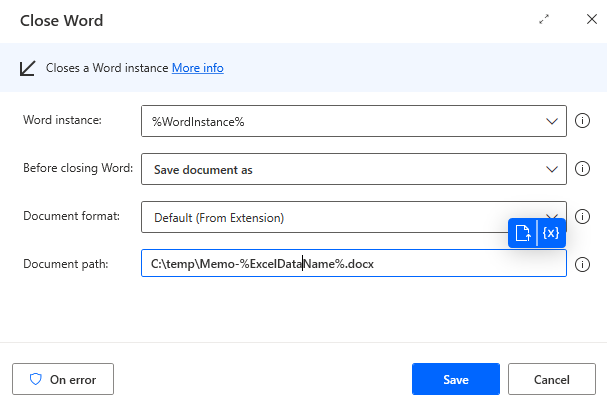
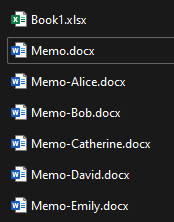
Darg Close Word into the loop and change the following variables. Before Closing Word needs to be set to Save document as. The path needs to be set to a location of your choosing but with a unique identifier for each document. Assuming each name will be unique we can simply add %ExcelDataName%.docx to the end of the path, this will cause each document to be saved with the name of the recipient in the file name.
Run the Flow
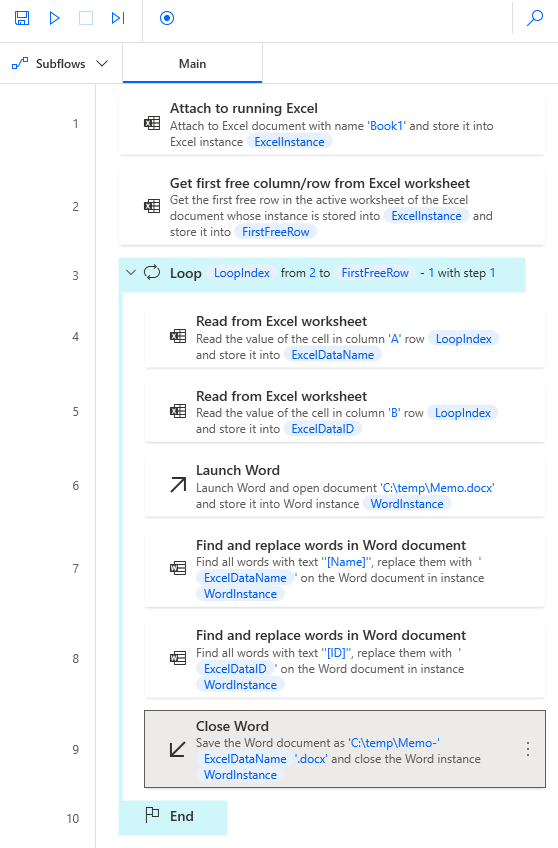
After completing the previous steps you should end up with a flow that looks something like this: ←
Now try running it, after it has finished cycling through each step you should find a new set of files in the output directory.
Try adding more employees, you should find that the flow will automatically adjust to any number of employees.
similarly try adding another [Name] section to the memo, assuming you turned All matches on in the replace actions you should find it will replace all instances with the employees name.
Conclusion
Power Automate is an excellent tool for automating repetitive tasks like creating custom memos for employees. By leveraging its integration capabilities with Excel and Word, we can efficiently generate personalized documents without manual intervention. This not only saves time but also ensures consistency and accuracy across all memos.
Just a simply as creating this flow, power automate can be used to fill out forms, sort or send emails, or even extract data form the web. So start automating your workflows today with Power Automate and experience the benefits of increased efficiency and productivity!
Leave a Reply